
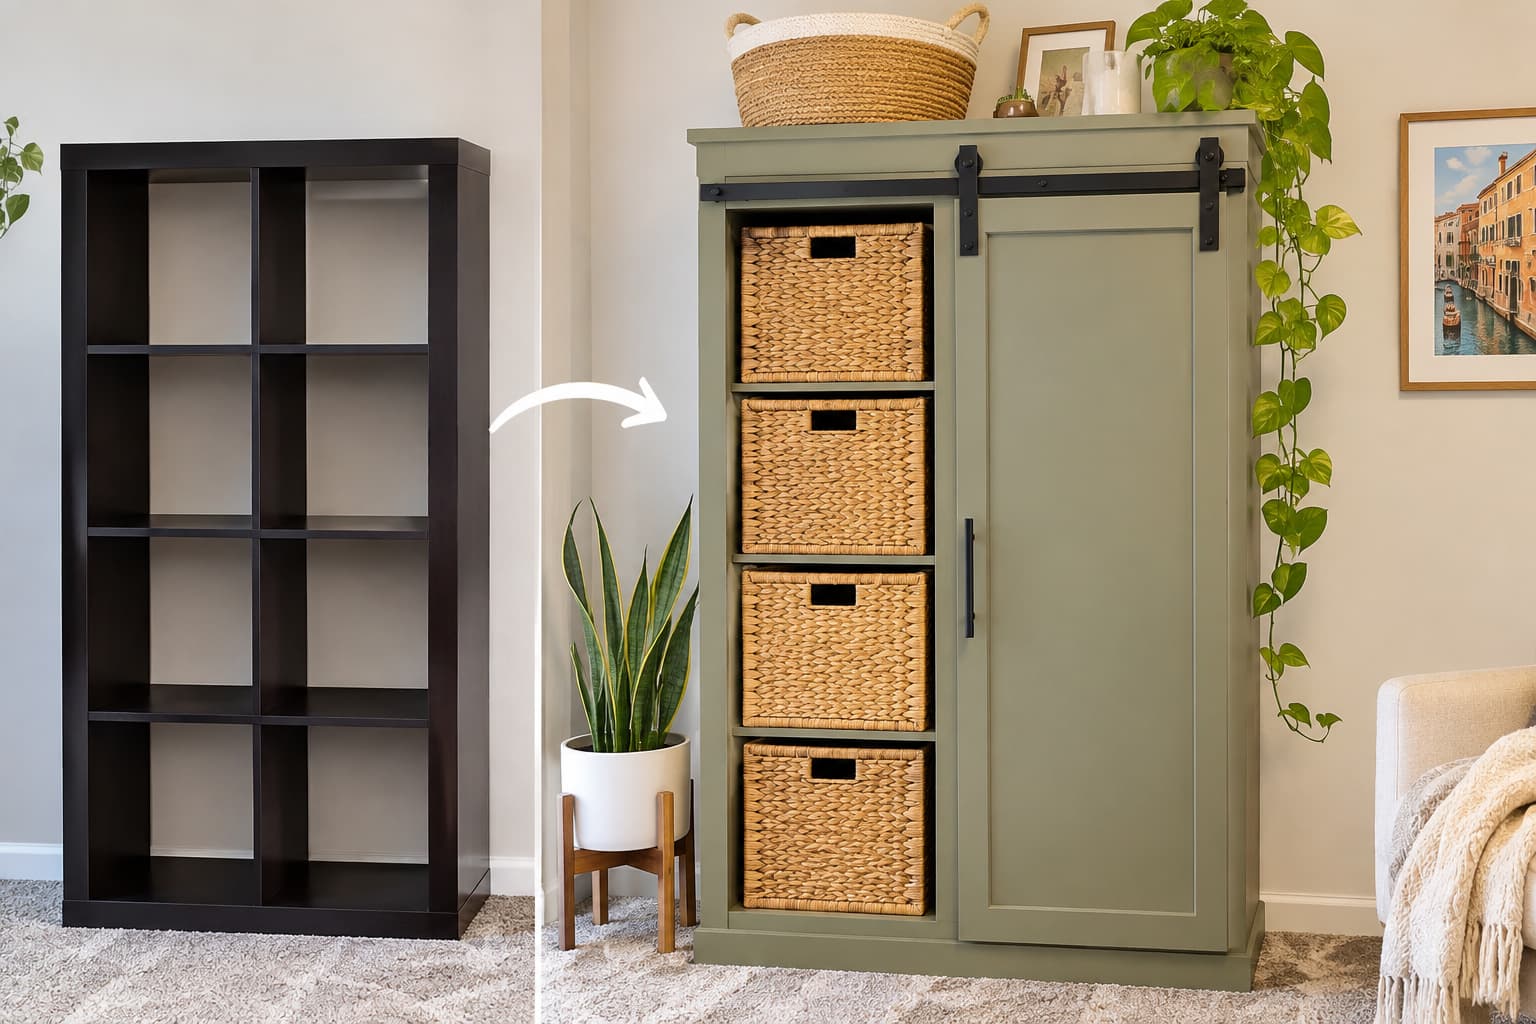
Every so often a piece of furniture transformation stops you mid-scroll. This one does it with a humble black-brown cube shelf, the kind most of us have owned at some point, and turns it into a tall, olive-green storage cabinet with a sliding barn door, a hidden hanging rail, and a column of woven baskets. It looks like something from a boutique furniture catalog, yet it started life as eight empty squares.
If your entryway, bedroom corner, or small apartment is begging for storage that does not cost a fortune, this is the kind of flip worth studying.
Why this makeover works so well
The before photo shows a standard eight cube shelf in dark wood grain. It is practical but forgettable. The after photo shows a piece with a clear personality, and that comes from three smart decisions.
First, the color. A muted olive or sage green with warm, earthy undertones feels current without being trendy. It pairs beautifully with natural wicker, black hardware, and houseplants, which is exactly the mix you see in the finished room.
Second, the structure. Instead of leaving all eight cubes open, the builder split the unit into two zones. One side holds four stacked baskets for everyday clutter, while the other side becomes a narrow closet with a hanging rod and a shelf above a bottom cubby. That single change turns a bookcase into a real piece of functional furniture.
Third, the sliding door. A barn door track in matte black gives the cabinet a farmhouse look, and because the door slides rather than swings, it needs no clearance in front. That matters in tight hallways and small rooms.
What you need to recreate the look
The project is built around a cube shelf with a hollow or sturdy frame, so choose one that holds screws well. You will also need a sheet of thin plywood or MDF for the door and the trim, a small barn door hardware kit with a track and rollers, a black door pull, a short closet rod with brackets, and a set of woven baskets that fit your cubes. For finishing, plan on a bonding primer, a quality cabinet or furniture paint in your chosen green, fine sandpaper, wood filler, and a little wood trim for the base and the top.
How the transformation comes together
Start by deciding which cubes will become the closet. In the example, a two cube wide section on one side was opened up by removing the center divider, which creates a tall open space for hanging coats and jackets. Remove dividers carefully so you can reuse them, because one of them can become the shelf that sits above the bottom cubby.
Next, prep the surface. Laminate and dark wood grain finishes are slick, so scuff sand everything and apply a bonding primer. This step decides whether your paint lasts for years or chips in weeks, so do not rush it. Fill any visible holes or seams, sand again lightly, and wipe away the dust.
Then build the door. A simple shaker style panel is the secret to the polished look here. Cut a flat panel to cover the closet side, then add thin strips of trim to form a rectangular frame on the front. Glue and nail them in place, fill the nail holes, and you have a door that looks like it cost three times as much.
Now paint. Two or three thin coats beat one thick coat every time. Let each coat cure properly and sand very lightly between coats for that smooth, factory style finish. Paint the door, the cabinet, and any added trim in the same color so the whole piece reads as one custom unit.
Finally, add the hardware. Mount a wooden header or rail across the top of the cabinet so the barn door track has solid support, since the track needs to be anchored into something sturdy rather than thin laminate. Install the rollers on the door, hang it, and attach the black pull handle. Add the closet rod inside, tuck a basket in the bottom cubby, and drop your four wicker baskets into the open cubes.
Styling it like the photo

The finishing touches are what make this piece feel intentional. A large cream and tan rope basket on top adds softness and extra storage for things you only need occasionally. A trailing plant spilling over the edge brings life and breaks up the straight lines. Framed travel prints on the wall behind it, in this case colorful city posters, add a playful contrast to the calm green.
Notice also how the color of the cabinet echoes the plants nearby. Matching your furniture tone to the greenery in the room is a quiet design trick that makes everything feel connected.
Tips to avoid common mistakes
Check the weight limits of your shelf before loading it with heavy coats, because most cube units are not designed to carry a hanging load. Reinforcing the closet side with a solid back panel or extra screws helps a lot. Measure your door twice, leaving a small overlap so no gaps show when it slides closed. And always test the track alignment before painting the final coat, so you are not tempted to scratch a finished surface while adjusting.
Where this piece would shine
This cabinet is ideal as an entryway coat closet in a home with no mudroom, as a compact wardrobe in a kid’s room or guest room, or as a stylish storage solution in a studio apartment. The baskets keep shoes, scarves, hats, and toys out of sight, while the hanging section handles daily jackets.
The bigger lesson
The real takeaway is that you do not need advanced carpentry skills to make furniture that looks custom. You need a good base piece, a clear vision, patient prep work, and a few well chosen details like paint color, trim, and hardware. When you stop seeing a cube shelf as a finished product and start seeing it as raw material, a whole world of upgrades opens up.
So the next time you spot a plain bookcase at a thrift store, a garage sale, or sitting in your own spare room, think about what it could become. A little paint and a sliding door might be all it needs.


Leave a Reply