
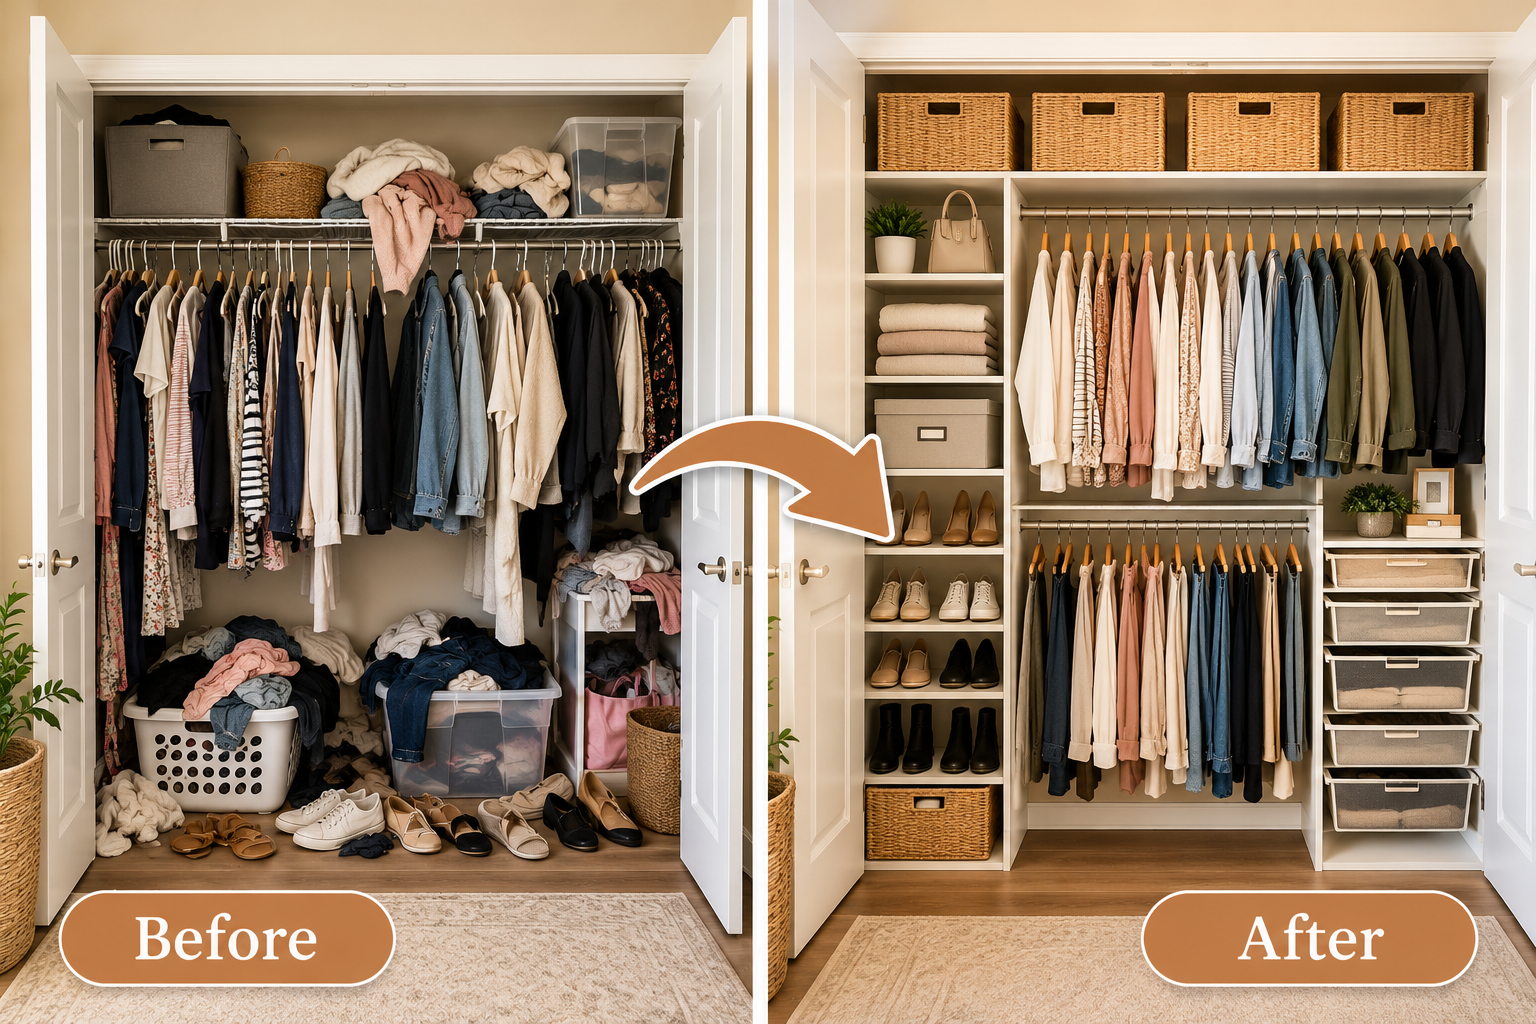
The Morning I Finally Had Enough of My Messy Closet
I was already running late when it happened again.
I pulled open my closet door, reached for my favorite sweater, and watched a pile of clothes slide off the shelf above it.
“Oh, not again!”
I stood there holding a sweater in one hand and trying to catch a pair of jeans with the other. A laundry basket sat in the corner, shoes were scattered across the floor, and several storage boxes were filled with things I hadn’t touched in months.
Somehow, finding one simple outfit had become the most frustrating part of my morning.
I stared at the mess and sighed.
How can I have so many clothes and still feel like I have nothing to wear?
My closet wasn’t particularly small. It simply wasn’t organized. I had been adding clothes, shoes, and storage boxes for years without ever creating a proper system.
That evening, I decided things had to change.
I didn’t want an expensive custom closet or a complete bedroom renovation. I wanted a practical solution that would help me find my clothes quickly, keep everything tidy, and make getting dressed feel enjoyable again.
So I started looking for closet organization ideas that I could actually use in my own home.
Step 1: I Took Everything Out
The next Saturday morning, I made myself a cup of coffee, opened the closet doors, and got to work.
My first instinct was to start folding clothes and rearranging shelves. But I knew that would only hide the problem temporarily.
Instead, I removed everything.
Shirts went on the bed. Shoes lined the hallway. Bags, scarves, and accessories covered a spare chair.
For a moment, the bedroom looked worse than the closet had.
“What have I done?” I joked to myself.
Then I looked inside the empty closet and realized how much space I had been wasting.
I could finally see the shelves clearly, measure the available hanging space, and identify the areas that needed improvement.
I also discovered clothes I hadn’t worn in years and accessories I had completely forgotten about.
I created three groups: items I wanted to keep, things I could donate or sell, and anything that needed repairing or special attention.
I didn’t force myself to get rid of things simply because they were old. If something fit well, served a purpose, and made me happy, I considered keeping it.
By lunchtime, I had removed a surprising amount of clutter.
Step 2: I Organized My Clothes by Category
Once I had decided what to keep, I needed a system.
Previously, I had hung shirts beside dresses, squeezed jackets between blouses, and folded sweaters wherever I could find room.
No wonder everything felt chaotic.
This time, I grouped similar items together.
- Shirts and blouses went in one section.
- Dresses and longer garments received their own hanging space.
- Jackets and heavier clothing were grouped together.
- Sweaters and everyday basics were folded neatly on shelves.
- Seasonal accessories were placed in labeled baskets.
I also arranged my clothes by color within each category. I started with lighter shades and gradually moved toward darker ones.
It wasn’t essential, but it made the closet look calmer and helped me spot individual pieces more quickly.
When my sister stopped by later that afternoon, she peeked inside the closet.
“Wait, is this the same closet?”
I laughed. “Give me another hour. I’m not finished yet!”
Step 3: I Discovered the Magic of Matching Baskets
The top shelf had always been my biggest problem.
It was filled with random bags, loose accessories, and piles of folded clothes that never seemed to stay in place.
I decided to use matching woven baskets to give everything a proper home.
One basket held scarves and hats. Another stored handbags and small accessories. A third was reserved for seasonal items I didn’t need every day.
I placed the baskets in a neat row and added simple labels so I could identify their contents without pulling everything down.
The difference was remarkable.
Instead of looking at a collection of mismatched boxes and loose belongings, I saw a tidy row of baskets that made the entire closet feel more intentional.
I also made sure the heaviest items stayed on lower shelves, where they were easier and safer to reach.
My favorite tip: Measure your shelf before buying baskets. Matching containers look beautiful, but they are only useful if they fit the space and hold the things you actually need to store.
Step 4: I Finally Gave My Shoes a Proper Home
If there was one part of my closet I had learned to ignore, it was the floor.
Shoes were everywhere.
Some sat in their original boxes, others were pushed beneath hanging clothes, and a few had somehow ended up in the wrong pairs.
Every morning, I seemed to lose precious minutes searching for the shoes I wanted.
I decided to make the lower section of the closet work harder.
I arranged my everyday shoes on a low shoe rack, keeping frequently worn pairs within easy reach. Boots and less frequently used footwear went into a separate section.
I placed seasonal shoes in labeled storage boxes and kept them out of the main daily-use area.
For delicate or expensive footwear, I made sure the storage provided enough room to maintain their shape and prevent damage.
Once the floor was clear, the entire closet felt larger.
It was such a simple change, yet it made the space much easier to clean and maintain.
Step 5: I Made Better Use of Vertical Space
While organizing the closet, I realized that I had been focusing on the shelves and hanging rails without thinking about the space between them.
There were gaps above folded clothes, unused sections beside hanging garments, and areas where a few additional organizers could make a difference.
I considered adding a shelf divider to keep folded sweaters from toppling over. A hanging organizer could hold handbags or lightweight accessories, while a small drawer unit could provide a home for socks and other everyday essentials.
I didn’t buy everything at once.
Instead, I identified the biggest remaining problem and chose one organizer that would solve it.
This helped me avoid spending money on products that looked attractive online but weren’t necessary for my closet.
I also checked the available clearance before adding anything, making sure drawers could open and clothing could hang without becoming cramped.
Step 6: I Created a System I Could Actually Maintain
The closet looked beautiful when I finished, but I knew the real challenge would begin the following week.
I had organized everything before, only to watch the mess return a few weeks later.
This time, I wanted a system that was easy enough to maintain on busy days.
I made three small rules for myself.
First, put clothes back where they belong. It sounds obvious, but hanging a shirt in its proper section takes less time than searching for it later.
Second, don’t let the floor become storage. Shoes belong on the rack, and items that don’t belong in the closet should be returned to their proper rooms.
Third, review the closet regularly. When I notice that a shelf is becoming crowded, I take a few minutes to put things back in order rather than waiting until everything becomes overwhelming.
I also keep a small donation bag nearby so I can collect items I no longer use.
These habits take very little time, but they help prevent clutter from building up again.
The Before and After: Was It Worth It?
A few days after finishing the project, I noticed a difference in my morning routine.
I opened the closet and could immediately see my options. My clothes were grouped neatly, folded items stayed in place, and shoes were easy to find.
There was no more digging through piles or moving boxes just to reach a sweater.
The matching baskets gave the upper shelves a clean appearance, while the organized hanging sections made the entire closet feel more spacious.
The transformation wasn’t just about making the closet look good in photographs. It was about making it work better for everyday life.
And the best part? I accomplished it without remodeling the room or investing in an expensive custom storage system.
I had used the shelves I already owned, repurposed a few containers, and added only the organizers that made a genuine difference.
When my husband looked inside, he smiled.
“So, does this mean you’ll never complain about your closet again?”
I paused.
“Let’s not get carried away,” I said, laughing. “But at least I’ll be able to find my jeans.”
Budget-Friendly Closet Organization Ideas Worth Trying
If your closet needs a refresh, you don’t have to copy an expensive designer wardrobe. Start with a few practical changes.
- Use matching hangers. Slim, sturdy hangers can create a more uniform appearance and help maximize hanging space.
- Add shelf dividers. These can help prevent folded clothes from falling into messy piles.
- Use baskets for small items. Scarves, belts, bags, and seasonal accessories are easier to manage when grouped together.
- Create a dedicated shoe area. A compact rack or properly sized boxes can keep footwear off the floor.
- Store seasonal clothing separately. Keep out-of-season items in suitable labeled containers, ensuring they remain clean and dry.
- Label storage containers. Clear labels make it easier to return things to their proper places.
- Make use of vertical space. Additional shelves and hanging organizers can be helpful when installed safely and positioned where items remain accessible.
The most important thing is to choose solutions that match your wardrobe and the dimensions of your closet.
You don’t need every organizer available on the market. You just need a system that works for you.
A Closet That Finally Makes My Mornings Easier
Looking back, I wish I had tackled this project sooner.
For years, I thought my closet was simply too small. In reality, I had been trying to store too many things without giving them proper places.
Once I removed what I no longer needed, grouped similar clothes, organized the shelves, and created a dedicated space for shoes and accessories, everything became easier.
Now, opening the closet doesn’t fill me with frustration. It feels like opening a space that was designed around my everyday routine.
And whenever I feel tempted to buy another storage box, I stop and ask myself one question:
Do I really need more storage, or do I need to organize what I already have?
That little question has saved me money, reduced clutter, and helped me keep my closet looking the way I want it to.
If your closet is overflowing, start small. Clear one shelf, sort one category of clothing, or organize the shoes on the floor.
You don’t have to transform everything in one day.
Sometimes, a few thoughtful changes are all it takes to turn a cluttered closet into a calm, functional space you’ll enjoy using every morning.


Leave a Reply