
The Empty Corner I Couldn’t Stop Looking At
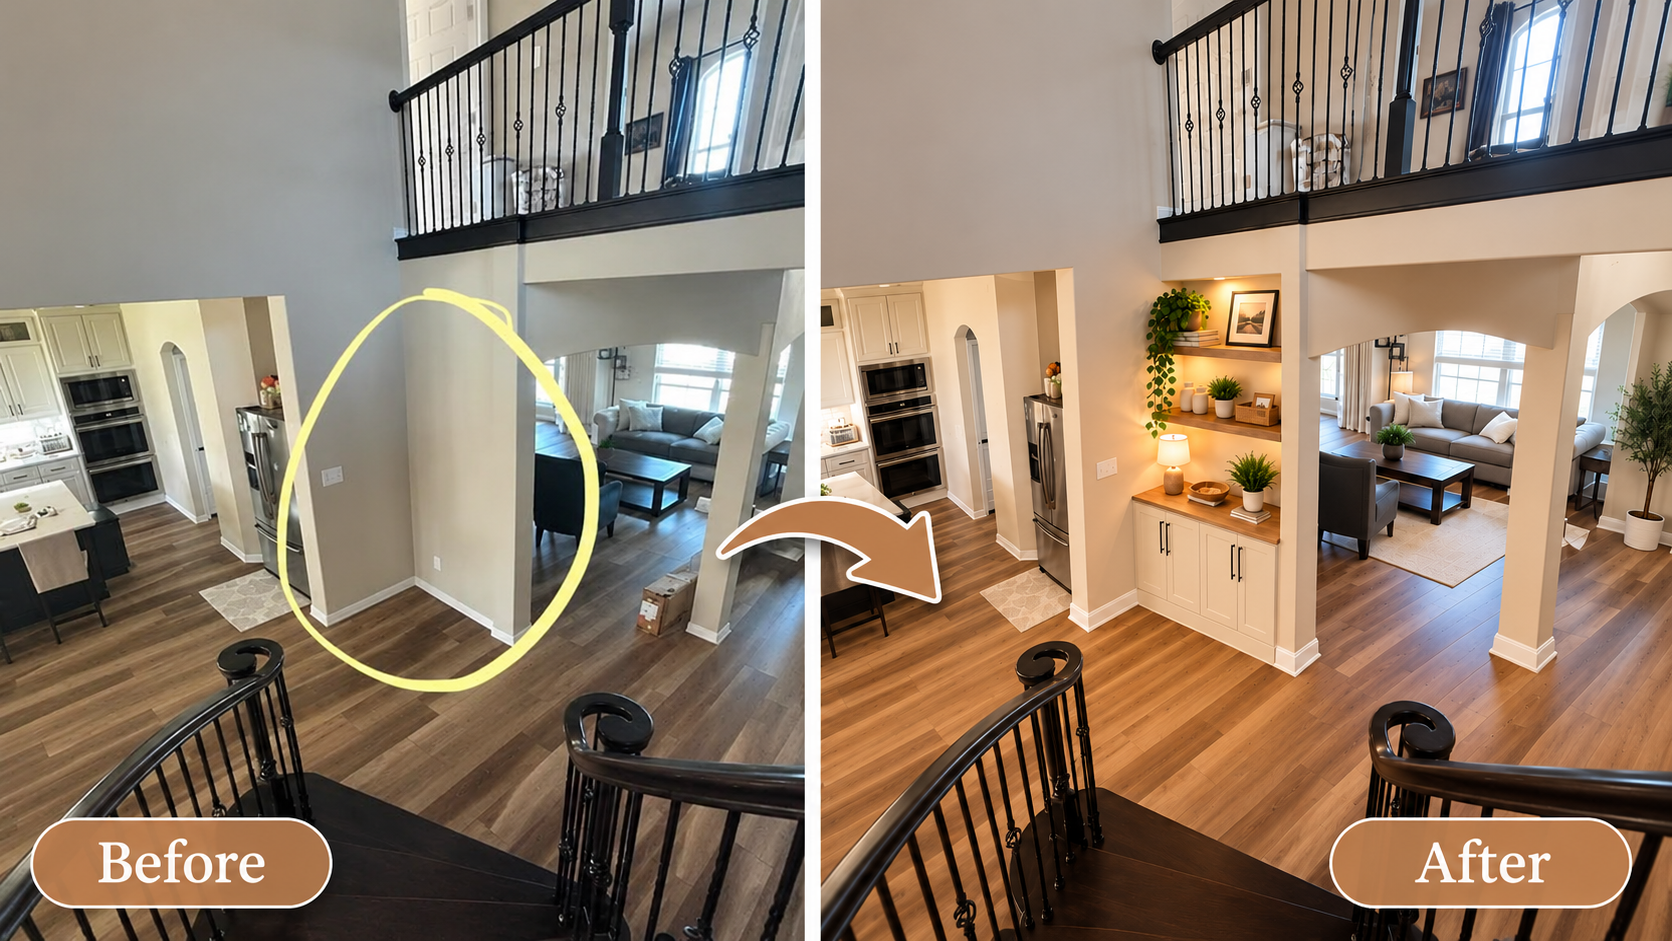
I remember standing at the top of our staircase one afternoon, looking down at the open-plan living area. The kitchen was on one side, the living room on the other, and the staircase connected everything beautifully.
But there was one thing I couldn’t stop noticing.
The empty space beneath the stairs.
It wasn’t exactly ugly. The walls were freshly painted, the flooring looked beautiful, and the room felt bright and spacious. Still, that little corner seemed unfinished, as if the house were waiting for me to do something with it.
I walked downstairs and stood right in front of it.
“What could I possibly do with this space?” I wondered.
At first, I considered placing a decorative plant there. Then I thought about a small table, perhaps a basket for blankets, or even a piece of artwork.
But none of those ideas felt quite right.
The more I looked at the area, the more I realized that I didn’t want to fill the space just for the sake of decorating. I wanted it to serve a purpose without making the open-plan room feel crowded.
That’s when I started exploring different under-stairs storage ideas.
1. Create a Built-In Storage Cabinet
My first thought was storage. Our kitchen cabinets were already doing their best, and I always seemed to have a few things that didn’t belong anywhere in particular.
Why not use that empty corner to solve the problem?
A built-in cabinet beneath the stairs could provide space for board games, household supplies, table linens, small appliances, or other items that tend to accumulate around the house.
I imagined simple cabinet doors painted the same color as the surrounding walls. They would blend into the room rather than compete with the kitchen or living room.
“That might actually make the whole area look cleaner,” I told myself.
The beauty of this idea is that the storage can be customized to fit the shape of the staircase. Lower sections can accommodate deeper drawers, while taller sections can hold shelves or cupboards.
My tip: Measure the available height, depth, and width before buying materials. If the staircase has structural supports or hidden utilities, consult a qualified professional before modifying anything.
2. Turn the Space Into a Small Coffee Station
As I stood there imagining cabinets, another idea came to mind.
What if this corner became a coffee station?
Because the staircase sits between the kitchen and living room, it could be a convenient place to prepare a morning coffee or serve drinks when friends visit.
I pictured a narrow console with a coffee machine, a few mugs on a shelf, a small tray for sugar, and a decorative jar filled with coffee beans. A warm pendant light or a simple wall light could make the corner feel welcoming.
“Coffee here in the morning, and straight to the sofa afterward,” I joked.
Of course, I would first need to check whether the area had suitable electrical access and enough clearance. I wouldn’t want cords running across the floor or a crowded counter interfering with the walkway.
This idea works especially well if the space is deep enough for a counter but too small for a full-sized piece of furniture.
3. Add Open Shelves for Everyday Essentials
Not every under-stairs project requires custom cabinetry.
Sometimes, a few well-planned shelves can make a surprisingly big difference.
I considered installing floating shelves along the wall, using the taller part of the space for books and decorative objects and the lower part for baskets.
The shelves could hold family photographs, a few favorite books, small plants, or attractive storage boxes. I would keep the arrangement simple, with enough empty space between objects to avoid a cluttered appearance.
Since the kitchen and living room already share the same open area, I would choose materials and colors that complement both spaces. Natural wood, white shelves, and neutral accessories would work beautifully with warm wood flooring.
A practical detail: Keep the shelves clear of the main walking route and avoid placing fragile decorations where they could be knocked over.

4. Make a Cozy Reading Nook
What if the space didn’t need to hide things at all?
Perhaps it could become a little place to pause.
If the available dimensions allow it, a compact built-in bench beneath the stairs could create a cozy reading nook. I imagined a comfortable cushion, two or three pillows, a small wall-mounted reading light, and a narrow shelf for books.
It wouldn’t need to be a large seating area. Even a simple bench could give the open-plan room a more personal touch.
I could picture someone sitting there with a cup of tea while dinner cooked in the kitchen, or a child settling down with a favorite book while the rest of the family relaxed in the living room.
“Now that’s a corner people might actually use,” I thought.
Before choosing this design, I would carefully check the headroom. A seating area should fit comfortably beneath the slope of the stairs without making anyone feel cramped or risk hitting their head.
5. Create a Stylish Drop Zone
One problem with open-plan homes is that everyday items can quickly spread from one room to another.
Keys end up on the kitchen counter. Bags land on dining chairs. Shoes gather near the nearest entrance.
I began wondering whether the under-stairs area could become a small household drop zone.
A narrow console, a few wall hooks, and two or three baskets could give everyday belongings a designated place. If the corner is close to the home’s main entrance, it might be especially useful for coats, bags, and shoes.
If it is farther from the entrance, I would use it for items that need to move between the kitchen and living room, such as reusable shopping bags, household chargers, or family organizers.
The secret would be keeping the arrangement compact. I didn’t want to turn a previously empty corner into another place where clutter could collect.
6. Use Baskets to Organize Without Spending Much
After exploring built-in furniture and custom designs, I reminded myself that a home improvement project doesn’t have to be expensive.
Sometimes, the simplest solution is the most practical.
A few matching baskets could hold blankets, magazines, children’s toys, or other frequently used items. I could place them on a low shelf or arrange them neatly along the wall if the floor space allowed.
Natural woven baskets would introduce texture and warmth, while fabric bins could create a softer, more modern look.
This approach would also let me test how I actually use the area before committing to permanent storage.
If the baskets turned out to be inconvenient, I could move them somewhere else without wasting much money.
Budget-friendly tip: Start with containers you already own. Measure the space first, then purchase only the pieces that fit comfortably.
7. Make It a Decorative Feature
Of course, not every empty space needs to become storage.
Sometimes, a corner simply needs a little character.
I considered using the wall beneath the staircase as a small design feature. A large framed print, a textured wall finish, or a carefully chosen piece of artwork could help connect the kitchen and living room visually.
A tall plant might also work if there were sufficient natural light and floor space. Alternatively, a sculptural vase or a narrow console could add interest without overwhelming the room.
I would stick to one main focal point rather than combining too many decorations.
The staircase already has strong visual lines, and the open-plan layout benefits from a sense of spaciousness. The goal would be to complement the architecture, not compete with it.
8. Combine Storage and Decoration for the Best of Both Worlds
Eventually, I realized that I didn’t have to choose between a useful corner and a beautiful one.
I could have both.
My favorite approach would be a low cabinet or a row of concealed storage units, topped with a few carefully selected decorative pieces. Closed storage would hide everyday clutter, while a framed print, a small plant, or a table lamp could make the area feel finished.
I would choose a cabinet color that complements the existing walls and a wood finish that works with the flooring.
Because the staircase connects two important parts of the home, I would also keep the design consistent with the kitchen and living room. Matching finishes and a restrained color palette would help the entire space feel intentional.
That balance is what makes the best under-stairs storage ideas so effective: they solve an everyday problem while improving the look of the room.
How I Would Plan the Project Without Overspending
Before buying anything, I would take a few practical steps.
First, measure the space. The sloping underside of the staircase means that height will vary considerably from one side to the other. I would measure several points rather than relying on one overall measurement.
Next, decide what the corner needs to do. Would it be more useful as storage, a coffee station, a reading nook, or simply a decorative feature? Choosing one main purpose would make the design much easier.
Then, set a realistic budget. A few baskets and shelves might be enough for a simple refresh, while custom cabinetry or electrical work would require a larger investment.
Finally, keep the walkway open. Since this space connects the kitchen and living room, furniture and storage should never obstruct normal movement through the house.
I would also check for electrical outlets, switches, plumbing, ventilation requirements, and structural elements before installing anything permanent.
My Final Thoughts: Small Spaces Can Make a Big Difference
Looking back at that empty corner beneath the staircase, I realized that I had been treating it as an awkward space simply because I hadn’t decided what it was for.
But it had plenty of potential.
It could become a practical storage area, a compact coffee station, a cozy reading nook, or a decorative feature that brings the kitchen and living room together.
If I were working with the space shown in the photo, I would start with a simple design that preserves the open feel of the room. A low cabinet with concealed storage and a few understated decorations would be my first choice. It would provide useful storage without making the corner feel crowded.
And the best part? I wouldn’t need to complete the whole project at once.
I could begin with a few baskets, live with the arrangement for a week, and then decide whether built-in storage was worth the investment.
Sometimes, the best home improvement ideas begin with a simple question: What if I used this space a little differently?
That one question can turn an overlooked corner into one of the most useful parts of a home.
- Closet Organization Ideas: How I Turned My Cluttered Closet Into an Organized Dream
- How I Turned an Awkward Kitchen Corner Into Extra Storage Without Remodeling
- How I Transformed an Awkward Space Under the Stairs Into a Beautiful Home Feature
- Under-Stairs Storage Ideas: How I Turned an Empty Space Into a Beautiful, Functional Corner
- 12 DIY Kitchen Cabinet Organization Ideas That Maximize Space
Leave a Reply