
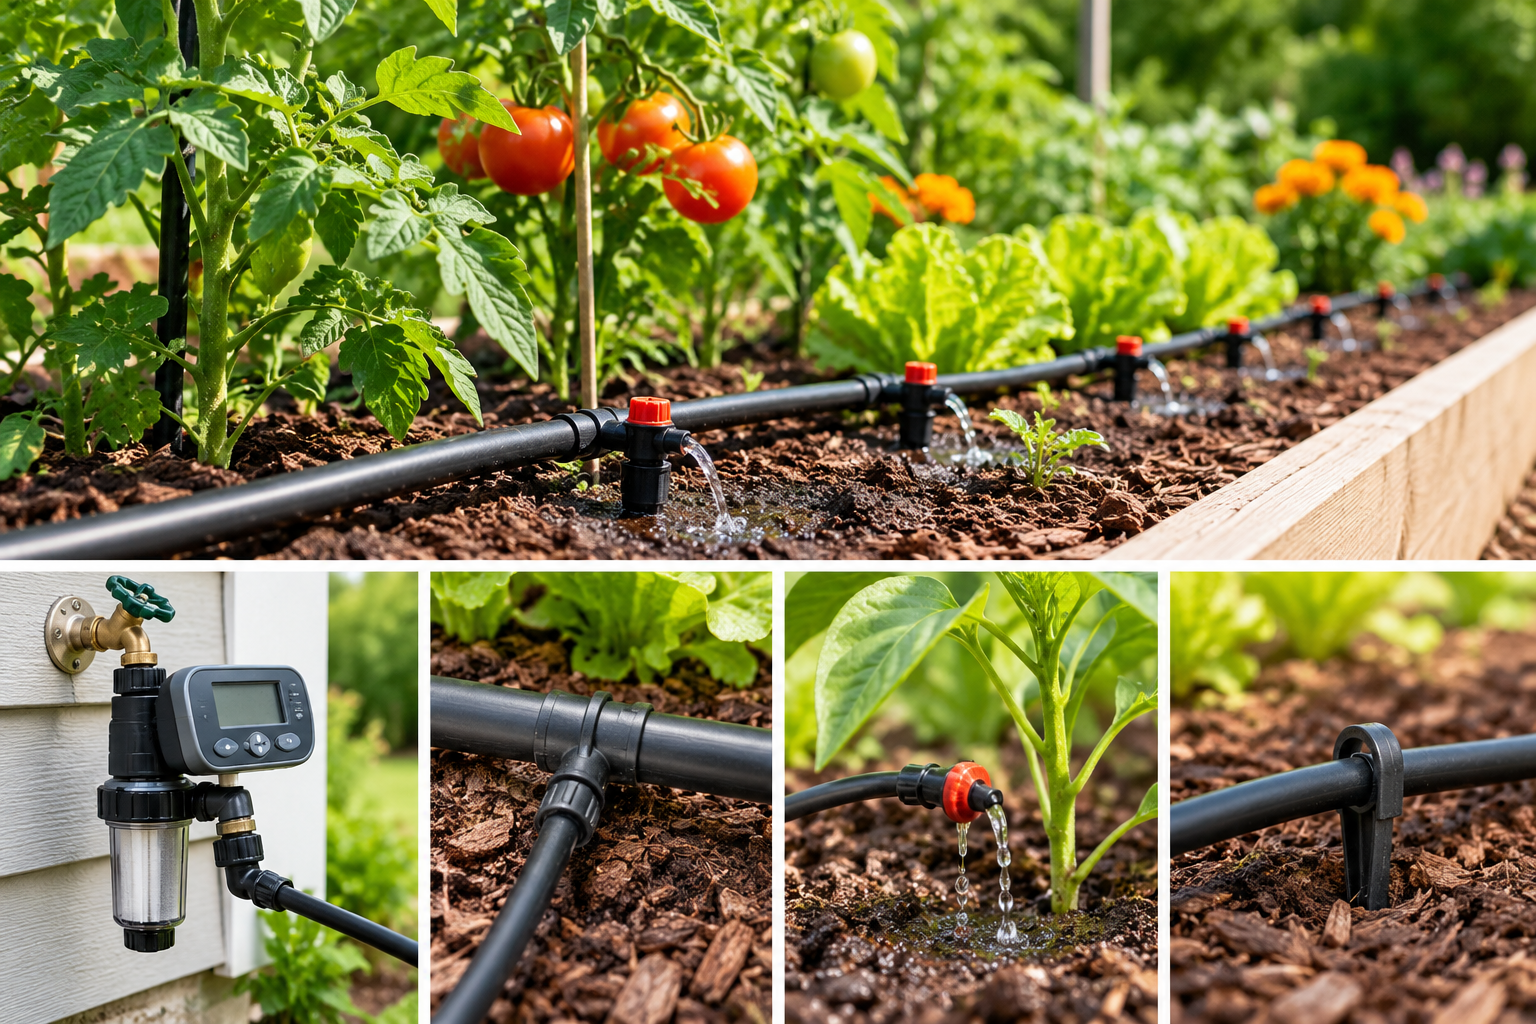
A Step-by-Step DIY Guide
Have you ever spent your evening watering garden plants with a hose, only to discover that some areas are still dry while others are soaking wet? I used to think watering the garden was a simple task, but keeping every plant healthy during hot weather can take more time than expected.
That’s when a drip irrigation system becomes a practical solution. Instead of spraying water everywhere, this system delivers it slowly and directly to the soil around your plants. The result is a more convenient way to water flower beds, vegetable gardens, shrubs, and other outdoor plants.
The good news is that you don’t necessarily need a professional to install one. With a few basic supplies and some careful planning, you can create a DIY drip irrigation system that suits your garden and budget.
In this guide, you’ll learn how drip irrigation works, which materials you’ll need, how to install the system step by step, and how to maintain it for reliable performance.
What Is a Drip Irrigation System?
A drip irrigation system is a watering method that delivers water directly to plants through a network of tubes, connectors, and small outlets called emitters.
Rather than spraying water over a large area, the system releases water slowly near the roots. This helps direct moisture where plants need it most and can reduce unnecessary water loss.
Drip irrigation works particularly well in vegetable gardens, raised beds, flower borders, container gardens, and landscaped areas with shrubs.
Depending on your setup, you can operate the system manually or connect it to a timer that automatically starts and stops watering.
Benefits of Installing Drip Irrigation
Before gathering your supplies, it helps to understand why drip irrigation is worth considering.
1. Save Water
Traditional sprinklers can lose water through evaporation and overspray, especially during hot or windy weather. Drip irrigation delivers water closer to the soil around plants, helping reduce these losses.
Actual water savings depend on your garden layout, watering schedule, soil type, and the efficiency of your existing watering method.
2. Spend Less Time Watering
Hand-watering a large garden can become a daily chore. Once your drip irrigation system is installed, you can water several plants simultaneously.
Adding a compatible timer can make the process even easier by automating your watering schedule.
3. Keep Plants Properly Hydrated
Consistent watering helps plants develop healthy roots. A properly designed drip system can distribute moisture more evenly than irregular hand-watering.
You can also adjust the placement and flow rate of emitters to accommodate different plants.
4. Reduce Watering on Walkways
Because the water is directed toward the soil around plants, less water ends up on sidewalks, patios, and other areas where it isn’t needed.
This can help reduce muddy patches and unnecessary water waste.
5. Create a Custom Garden Setup
You don’t have to install the same arrangement throughout your entire garden. You can design separate sections for vegetables, flowers, shrubs, and containers.
A modular layout also makes it easier to expand your system as your garden grows.
Materials and Tools You’ll Need
The supplies required depend on your garden’s size and the type of irrigation system you choose.
Here’s a basic shopping list for a typical DIY installation.
| Material | Purpose |
|---|---|
| Outdoor faucet connection | Connects the system to the water source |
| Hose timer (optional) | Automates watering |
| Backflow preventer | Helps protect the potable water supply from backflow contamination |
| Irrigation filter | Removes particles that could clog emitters |
| Pressure regulator | Reduces water pressure to the system’s required level |
| Main irrigation tubing | Carries water through the garden |
| Smaller distribution tubing | Directs water toward individual plants |
| Emitters or dripline | Releases water into the soil |
| Tubing connectors | Join sections and create branches |
| End caps or closures | Close the ends of irrigation lines |
| Tubing stakes | Secure tubing in place |
| Measuring tape | Helps estimate tubing requirements |
| Garden scissors or tubing cutter | Cuts tubing cleanly |
| Mulch (optional) | Covers exposed tubing and helps retain soil moisture |
You can purchase the components separately or buy a complete drip irrigation kit. For beginners, a kit designed for the size and layout of your garden is often the easiest option.
Always follow the manufacturer’s instructions for component compatibility and installation order.
Step 1: Plan Your Drip Irrigation Layout
Before cutting tubing or connecting anything to your faucet, take a few minutes to plan the system.
Walk around your garden and identify which plants need regular watering. Measure the approximate distances between the water source and the areas you want to irrigate.
Draw a simple garden map showing:
- The location of your outdoor faucet.
- Flower beds and vegetable rows.
- Individual shrubs and trees.
- Raised beds and containers.
- Paths, patios, and other obstacles.
- Possible routes for the main irrigation tubing.
For example, if you have a vegetable bed next to a flower border, you might run one main line along the edge of both areas and use smaller branches to reach individual plants.
A helpful tip: Group plants with similar watering requirements into the same irrigation zone. Plants that need frequent watering may not do well on the same schedule as drought-tolerant plants.
Planning the layout first helps prevent unnecessary tubing purchases and makes future maintenance easier.
Step 2: Choose the Right Drip Irrigation Kit
Not every kit is suitable for every garden.
A small patio with a few containers may need only a basic kit, while a large vegetable garden may require additional tubing, connectors, and separate watering zones.
When choosing a kit, consider the following factors:
Garden size: Check the total tubing length and coverage recommendations.
Number of plants: Make sure the kit includes enough outlets and connectors.
Water pressure: Select components compatible with your water supply.
Plant requirements: Choose emitters that provide an appropriate flow rate.
Automation: Decide whether you want a manual system or a timer-controlled setup.
Expansion: If you plan to add more plants later, choose a system that can be expanded with compatible components.
Avoid assuming that a kit can support an unlimited number of emitters. The available flow and pressure determine how much of your garden the system can water effectively.
Step 3: Connect the System to Your Water Source
Most small residential drip irrigation systems connect to an outdoor faucet.
Before beginning, turn off the water and check that the faucet connection is in good condition.
Install the components specified by your kit. A typical arrangement may include a timer, backflow preventer, filter, pressure regulator, and drip tubing adapter.
The exact order depends on the manufacturer’s instructions and local plumbing requirements.
Each component has a specific function:
- The timer controls when water flows.
- The backflow preventer helps prevent irrigation water from entering the potable water supply.
- The filter removes debris.
- The pressure regulator provides suitable operating pressure.
- The adapter connects the faucet assembly to the irrigation tubing.
Tighten the fittings securely, but avoid overtightening plastic connections.
If local plumbing rules require a particular backflow prevention device, follow those requirements rather than relying on a generic irrigation kit.
Step 4: Lay Out the Main Irrigation Tubing
Once the faucet assembly is ready, run the main tubing along the route you planned.
Position it close enough to the plants that the smaller distribution lines can reach their root zones.
For a vegetable garden, you might run the tubing along the side of a raised bed. For a flower border, it could follow the edge of the planting area.
Use compatible connectors to join sections, make turns, and create branches where necessary.
Before cutting the tubing, double-check the measurements. Leaving a little extra length at strategic points can make future adjustments easier.
If the tubing feels stiff, allow it to warm naturally in the sun, provided the manufacturer permits this. Flexible tubing is generally easier to fit over connectors.
Secure the line with stakes so it doesn’t shift when the water is turned on.
Step 5: Install the Drip Emitters
Now comes the part that directs water to your plants.
The best emitter arrangement depends on the type of plants you have and how they’re spaced.
For Vegetable Gardens
Vegetables such as tomatoes, peppers, and cucumbers often benefit from water delivered near their root zones.
You can use individual emitters for widely spaced plants or a suitable dripline along a row of closely spaced vegetables.
For Flower Beds
Individual emitters or dripline can work well for flowers, depending on the planting arrangement.
Place the outlets where water can reach the roots without unnecessarily wetting paths or nearby structures.
For Shrubs and Small Trees
Larger plants may need more than one emitter to distribute moisture around the root zone.
As plants grow, check whether the existing arrangement still delivers water where it’s needed.
How to Choose an Emitter
Emitters are available in different flow rates. A higher flow rate isn’t automatically better.
Consider the plant’s water requirements, soil drainage, emitter specifications, and the time available for watering.
In sandy soil, water may move downward quickly, while clay soil may absorb it more slowly. You may need to adjust the emitter arrangement or watering duration to suit your soil.
Keep the emitters accessible so you can inspect and clean them when necessary.
Step 6: Close the Ends and Secure the Tubing
After connecting the emitters and distribution lines, close the ends of the main tubing using the appropriate end caps or closures.
An open line can allow water to escape and prevent the system from operating as intended.
Check that every connector is compatible with your tubing diameter. Even a small mismatch can cause leaks.
Use stakes to keep the tubing in position, particularly around corners and along exposed garden edges.
If your system has several branches, label them if necessary. This can make it easier to identify which section needs attention when something goes wrong.
Step 7: Test the Entire System
Before covering the tubing with mulch, turn on the water and inspect the installation.
Start by checking the faucet connection and then work your way along the main line.
Look for:
- Leaking connectors.
- Loose tubing.
- Blocked emitters.
- Emitters that release little or no water.
- Water flowing where it isn’t needed.
- Sections that appear to receive less water than others.
If you find a leak, shut off the water before repairing the connection.
Flush the tubing according to the manufacturer’s instructions if debris is present. Clean or replace clogged emitters as appropriate.
Observe the soil around the plants after watering. The surface may appear damp while deeper soil remains dry, so check moisture at an appropriate depth rather than relying on appearance alone.
If some areas receive less water than others, you may need to adjust the layout, reduce the number of emitters on a line, or create additional irrigation zones.
Step 8: Set Up an Automatic Watering Timer
An irrigation timer is optional, but it can make garden maintenance much more convenient.
A compatible timer connects to your outdoor faucet and allows you to schedule when the system runs.
To set up your timer:
- Read the manufacturer’s operating instructions.
- Set the correct time and date if required.
- Choose a starting time that suits your garden and local watering restrictions.
- Set the watering duration.
- Select the watering days or interval.
- Test the schedule manually before relying on automatic operation.
Don’t assume that every garden needs the same watering duration.
A short watering session may be enough for some containers, while larger planting areas may need a different schedule. Soil type, weather, plant species, and the flow rate of your emitters all affect how much water is required.
Check soil moisture regularly and adjust the timer when temperatures, rainfall, or plant needs change.
Step 9: Cover the Tubing With Mulch (Optional)
Once the system has passed its initial test, you can decide whether to leave the tubing visible or cover it with mulch.
Mulch can improve the appearance of a garden bed, help conserve soil moisture, and protect some exposed tubing from direct sunlight.
Spread the mulch carefully rather than burying the system deeply.
Keep emitters and important connections accessible enough to inspect and repair. Avoid covering the tubing with materials that could damage it or make maintenance difficult.
If you have a garden where the tubing may be disturbed frequently, leaving the main line visible can make future repairs easier.
Common Drip Irrigation Problems and How to Fix Them
Even a well-installed system can occasionally develop problems. Fortunately, many common issues are straightforward to diagnose.
Problem 1: Some Emitters Aren’t Releasing Water
Possible causes: Clogged emitters, debris in the tubing, insufficient water pressure, or a closed valve.
Solution: Check the water supply, inspect the filter, and clean or replace the affected emitters. Flush the lines according to the manufacturer’s instructions.
Problem 2: Water Leaks From a Connector
Possible causes: Loose fittings, damaged tubing, incompatible parts, or incorrectly installed connectors.
Solution: Turn off the water and inspect the connection. Refit or replace the damaged component with a compatible part.
Problem 3: The Plants Still Look Dry
Possible causes: Insufficient watering time, poorly positioned emitters, clogged outlets, or water that isn’t reaching the root zone.
Solution: Check the soil moisture, inspect the emitters, and adjust the watering schedule or outlet placement. Make sure the system provides adequate water for the plants’ needs.
Problem 4: Water Pools Around Certain Plants
Possible causes: Excessive watering, high emitter flow, compacted soil, or poor drainage.
Solution: Reduce the watering duration or use a more suitable emitter. Check whether the soil drains properly before increasing the amount of water.
Problem 5: The Tubing Keeps Moving
Possible causes: Insufficient stakes, poorly secured turns, or pressure changes when the system starts.
Solution: Add compatible tubing stakes and secure loose sections. Check the connections and ensure the system operates within its specified pressure range.
How to Maintain Your Drip Irrigation System
Regular maintenance helps your system work efficiently throughout the growing season.
Inspect the System Regularly
Walk through the garden while the water is running. Check for leaks, clogged outlets, loose connections, and damaged tubing.
Clean the Filter
Follow the manufacturer’s cleaning instructions. A clogged filter can restrict water flow and affect the performance of the entire system.
Check Emitters
Mineral deposits and debris can interfere with water delivery. Clean or replace emitters as recommended by the manufacturer.
Adjust the Watering Schedule
Review the schedule after heavy rainfall, during hot weather, and as plants mature.
Avoid watering automatically when the soil is already sufficiently moist.
Protect the System From Damage
Keep tubing away from sharp garden tools, heavy foot traffic, and areas where it could be cut accidentally.
If freezing temperatures occur in your area, follow the manufacturer’s instructions for draining and storing components before winter.
Is a DIY Drip Irrigation System Worth It?
For many homeowners, installing drip irrigation is a worthwhile garden improvement.
The initial cost depends on the size of the garden, the type of kit, the number of emitters, and whether you choose to add a timer.
A small garden can often be served by a relatively simple system, while a larger property may require multiple zones and additional components.
The biggest advantage is convenience. Once the system is properly installed and adjusted, you can spend less time watering by hand and more time enjoying your garden.
However, drip irrigation isn’t completely maintenance-free. Filters need attention, emitters can clog, and watering schedules must be adjusted as conditions change.
A little routine maintenance can help prevent small problems from becoming larger ones.
Frequently Asked Questions
How long does it take to install a drip irrigation system?
A simple system for a small garden may take a few hours to install. Larger gardens with multiple zones, complicated layouts, or extensive tubing can take longer.
Planning the layout before installation can save time.
Can I install drip irrigation without professional help?
Yes. Many homeowners can install a basic system using a kit and common garden tools. More complicated installations, permanent plumbing changes, or systems requiring specialized backflow protection may need professional assistance.
How often should I run my drip irrigation system?
There is no single schedule that works for every garden. Watering frequency depends on plant species, soil type, weather, root depth, and emitter flow rate.
Check soil moisture and adjust the schedule to meet your plants’ needs.
Should drip irrigation tubing be buried?
Not necessarily. Many residential systems are designed to operate on the soil surface, sometimes beneath a layer of mulch.
Follow the manufacturer’s instructions and keep important connections accessible for maintenance.
Does drip irrigation work for container plants?
Yes. Small drip irrigation kits can be adapted for pots and containers, provided the emitters are suitable for the plants and the system can distribute water adequately.
Containers may dry out faster than garden beds, so check their moisture levels regularly.
Can drip irrigation reduce my water bill?
It may reduce water consumption if it replaces a less efficient watering method. Actual savings depend on your existing system, the size of your garden, your watering habits, and local water rates.
Final Thoughts
Learning how to install a drip irrigation system is a practical way to make garden care easier and potentially reduce unnecessary water use.
Start with a simple layout, choose compatible components, and position the emitters according to your plants’ needs. Test the entire system before covering the tubing, then inspect it regularly to catch leaks and blockages early.
You don’t need an elaborate setup to get started. A carefully planned DIY drip irrigation system can provide reliable watering for flower beds, vegetable gardens, shrubs, and containers while making your outdoor space easier to maintain.
Ready to make watering your garden easier? Start by measuring your garden, identifying your plants’ watering needs, and choosing a drip irrigation kit that fits your space and budget.


Leave a Reply