
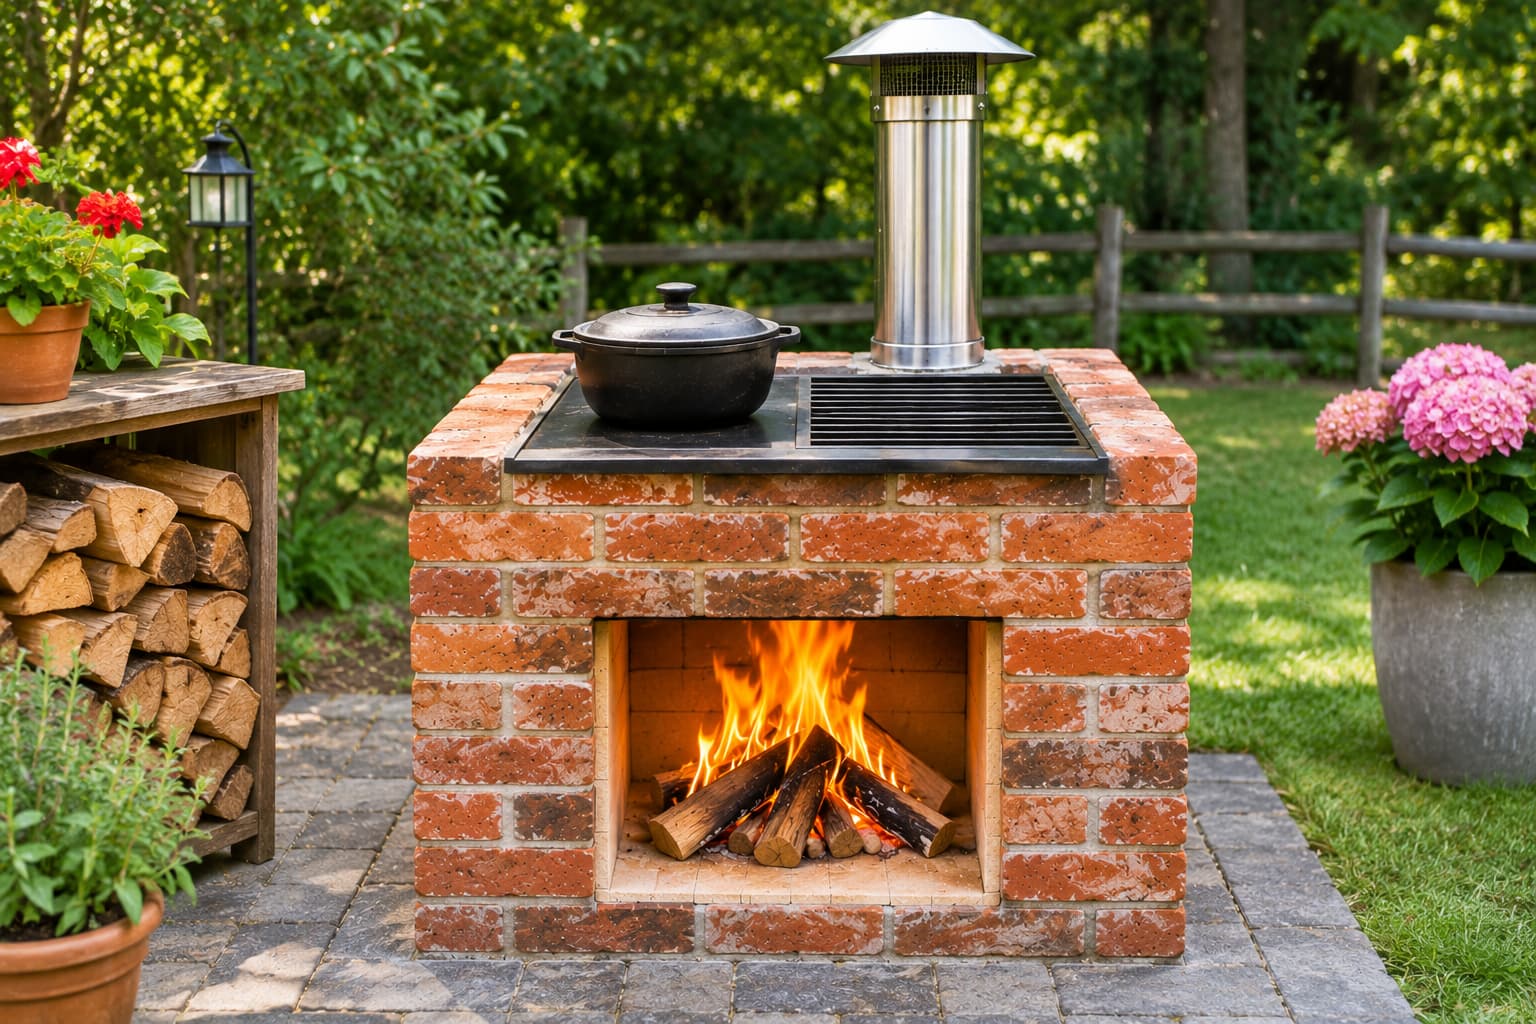
Old bricks have a habit of piling up behind sheds, in skips, and at the edge of demolition sites. Most people see rubble. A clever builder sees a free, heat tolerant building material that can become a sturdy outdoor wood burning stove for cooking, boiling water, and warming a cool evening. A DIY outdoor wood burning stove made from reclaimed bricks costs very little, needs no welding, and can be built over a weekend. This guide walks through the full build and answers the questions people ask along the way, including which recycled bricks are safe to use and how to stop the whole thing from cracking.
What you will build
This plan creates a freestanding brick stove about 36 inches long, 24 inches deep, and 34 inches tall, with a firebox opening at the front, a flat cooking surface on top, and a short chimney at the back. It is compact enough for a small patio or garden, yet large enough to hold a big pot or a cast iron pan.
How much does it cost to build a brick wood burning stove?
If you collect your own reclaimed bricks, expect to spend roughly 40 to 120 dollars. Most of the cost goes to refractory mortar, a steel cooking plate or grate, and a length of stainless steel flue pipe. Buying bricks from a salvage yard raises the total, but it is still far cheaper than a ready made outdoor stove, which often costs several hundred dollars.
Can you use recycled bricks to build a wood burning stove?
Yes, but not every old brick is up to the job, and this is the most important point in the whole project. Standard clay house bricks handle moderate heat, which is fine for the outer walls. The inside of the firebox takes far more punishment, so line it with fire bricks, which are made to survive repeated high temperatures. Many builders salvage firebricks from old fireplaces, kilns, and pizza ovens, and these are the best recycled choice for the inner lining.
Which old bricks should you avoid?
Skip bricks that are glazed, painted, or coated, because the coating can flake or release fumes when heated. Avoid bricks that feel soft, crumble in your hand, or have deep cracks. Be careful with very dense bricks that have been sitting wet for years, since trapped moisture can turn to steam and cause spalling, where the surface pops off in flakes. Never use bricks from industrial sites where they may have been exposed to chemicals. Tap each brick with a hammer. A clear ringing sound means it is solid, while a dull thud usually means a hidden crack.
Materials and tools
For the structure you will need about 90 to 110 reclaimed clay bricks for the outer walls, 25 to 35 fire bricks for the firebox lining, a bag of refractory mortar or a mix of fire clay and sand, a steel cooking plate or heavy grate sized to fit the top, and a short section of stainless steel flue pipe about 4 to 5 inches wide with a rain cap. For the base, collect about 8 cubic feet of paver base gravel and a few concrete pavers. Tools include a trowel, a bucket, a level, a rubber mallet, a tape measure, a brick hammer, a wire brush, safety glasses, and thick gloves.

Step one: choose a safe spot
Place the stove on flat, open ground well away from your home, fences, sheds, and overhanging branches. A distance of at least 10 to 15 feet from any structure is a common minimum.
How far should an outdoor wood stove be from the house?
Local rules vary, but 10 to 25 feet is a typical range, and some areas require more. Check with your local fire department or city website before you start, and find out whether burn bans apply in your area. Pick a spot that is sheltered from strong wind but still open enough for smoke to escape freely.
Step two: build a solid base

Mark a rectangle slightly larger than the stove, about 40 by 28 inches. Dig down roughly 4 inches, add a layer of gravel, and compact it firmly. Lay concrete pavers on top and check that they are perfectly level in every direction. A strong, level base stops the stove from leaning as the ground freezes and thaws, and it keeps moisture away from your bricks.
Step three: clean and sort your bricks

Scrape off old mortar with a brick hammer and wire brush so the faces sit flush. Sort your bricks into three groups: fire bricks for the lining, your best clay bricks for the visible outside, and slightly damaged ones for hidden spots such as the back. Dry fit the first course without mortar to confirm the layout before you commit.
Step four: lay the floor of the firebox

Spread a thin bed of refractory mortar on the pavers, then lay a floor of fire bricks inside the footprint. Leave the joints tight, and keep the surface level so a pot never wobbles. Many builders raise the floor on a layer of brick to improve airflow under the fire, but a flat floor works well for a first project.
Step five: raise the walls
Build the outer walls with clay bricks, staggering the joints so each course overlaps the one below it, just like a wall. Inside, line the firebox with fire bricks on all three sides, leaving the front open for loading wood. Keep a gap of about a quarter inch between the lining and the outer wall, filled loosely with sand, so both layers can expand independently when hot.

Why do brick stoves crack?
Most cracks come from uneven heating, trapped moisture, or tight joints that leave no room for expansion. The fix is simple. Use refractory mortar for any bricks near the flame, leave the expansion gap described above, and let your mortar cure for at least 24 to 48 hours before lighting anything.
Step six: form the cooking surface and opening

Stop the walls at about 34 inches tall, then lay a steel plate or heavy grate across the top so it rests on at least an inch of brick on each side. Leave a rectangular opening at the back for the flue. At the front, build a lintel using a flat steel bar or a row of bricks resting on a metal support, so the firebox opening stays strong over time. Make sure the opening is tall enough to feed in logs but small enough to concentrate the heat.
Step seven: install the chimney
Seat the stainless steel flue pipe firmly in the rear opening and seal the joint with heat resistant mortar or high temperature sealant. Extend it at least 3 feet above the cooking surface, and fit a rain cap to keep water out. A good chimney pulls air through the firebox, which means a hotter fire, less smoke, and fewer sparks drifting around your yard.

How tall should the chimney be?
Taller is better for draw, and a 3 to 4 foot chimney suits most small outdoor stoves. If smoke comes back into your face, add another section of pipe rather than changing the firebox.
Step eight: cure it and light the first fire
Wait at least two days for the mortar to dry completely. Then light a small fire of dry kindling and let it burn for about 30 minutes, repeating the process for two or three days with gradually larger fires. This slow curing drives out moisture and greatly reduces the risk of cracking. Once it has cured, your stove is ready for real cooking.

What wood should you burn in an outdoor stove?
Seasoned hardwoods like oak, beech, ash, and maple burn hot and clean with little smoke. Softwoods such as pine light quickly and work well as kindling, but they spark more and leave more residue. Never burn treated, painted, or pressure treated wood, because it releases harmful chemicals, and never use gasoline or other accelerants to start a fire.
Is a brick outdoor stove safe for cooking?
It is, as long as you follow a few rules. Use only clean, unpainted, untreated materials for any surface that touches food, keep the cooking plate clean, and avoid cooking directly on any surface made from reclaimed material you cannot identify. Keep children and pets back from the stove while it is lit, and always keep a bucket of water, sand, or a garden hose close at hand.
How long will a recycled brick stove last?
With fire brick lining, a good base, and a cover to keep rain out, a stove like this can last ten years or more. A simple metal lid or a custom wooden cover over the cooking surface protects it from the weather during the off season. Check the mortar joints each spring and repoint any that have crumbled.
Smart extras that make it better
Add a small shelf from a spare paver beside the stove for tools and plates. Paint the outer walls with a masonry paint rated for outdoor use, keeping it well away from the firebox. Build a log storage rack from leftover bricks nearby, or place a few decorative stones around the base to create a tidy, finished look.
Mistakes to avoid
Skipping the fire brick lining is the fastest way to a cracked stove. Using wet or damaged bricks leads to popping and flaking. Building directly on soil causes shifting and leaning within a season. Lighting a big fire before the mortar has cured is the most common reason new builds split. And placing the stove too close to a fence or house is the biggest safety risk of all.
Final thoughts
A DIY outdoor wood burning stove proves that great projects do not need new materials or a big budget. Reclaimed bricks, a little mortar, and a free weekend can turn leftover rubble into a durable cooking and heating feature that brings people together all year. Collect your bricks, test them carefully, and build slowly, and by the end of the weekend you could be cooking dinner over a fire you built yourself.

Leave a Reply